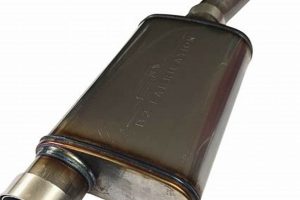
The procedures involved in affixing a sound-dampening component to a vehicle’s exhaust system constitute a significant aspect of automotive maintenance. This process typically involves detaching the old, damaged, or inefficient component and securely attaching a replacement unit, thereby reducing the noise generated by the engine’s combustion process. For instance, an individual may undertake this task if the original equipment has corroded or sustained physical damage, leading to increased exhaust volume.
Proper execution of this task ensures compliance with noise pollution regulations and enhances the overall driving experience by minimizing undesirable sounds. Historically, the evolution of automotive technology has consistently emphasized sound reduction strategies, highlighting the importance of effective exhaust system components in promoting quieter and more comfortable vehicle operation. Functioning components also contribute to optimal engine performance by maintaining proper backpressure, which is essential for efficient exhaust gas flow.
The following sections will detail the necessary tools, preparatory steps, and sequential actions required to safely and effectively complete this maintenance task, ensuring that the replacement component is correctly installed and functions as intended.
Essential Considerations for Attaching a Sound-Dampening Exhaust Component
The following recommendations are crucial for ensuring a successful and safe process during the replacement of a sound-dampening component within the exhaust system. Adherence to these points minimizes potential complications and maximizes the lifespan of the newly installed unit.
Tip 1: Prior to commencement, verify compatibility between the replacement unit and the vehicle’s make, model, and year. Incorrect component selection can lead to performance issues or improper fitment.
Tip 2: Employ penetrating oil liberally on all fasteners and joints prior to attempting removal. This action facilitates disassembly by reducing friction and mitigating the risk of damaging or stripping bolts and nuts.
Tip 3: Always utilize appropriate safety gear, including eye protection and gloves. Exposure to rust, debris, and sharp edges is common during exhaust system maintenance.
Tip 4: When disconnecting the exhaust system from the vehicle, provide adequate support to prevent components from falling and causing injury or damage. Exhaust hangers are often brittle and may require replacement.
Tip 5: Ensure proper alignment of all connections prior to tightening fasteners. Misalignment can induce stress on the system, leading to premature failure or leaks.
Tip 6: When tightening fasteners, adhere to the manufacturer’s specified torque values. Over-tightening can damage threads or gaskets, while under-tightening can result in leaks or loosening.
Tip 7: After installation, inspect the entire exhaust system for leaks. Listen for unusual noises or feel for escaping exhaust gases around joints and connections. Resolving any leaks promptly is essential for optimal performance and safety.
These considerations represent essential facets of the maintenance task. Diligent application of these guidelines promotes a successful outcome and contributes to the longevity of the exhaust system.
The subsequent sections will further elaborate on specific techniques and best practices to augment the comprehension of the process.
1. Preparation
Prior to commencing any exhaust system maintenance, meticulous preparation is paramount for successful component integration. This phase encompasses several critical actions, the omission of which can directly impede the process and potentially compromise the integrity of the system. The initial step involves the accurate identification of required tools, including wrenches, sockets, penetrating oil, and safety equipment. The absence of a specific tool can cause delays or necessitate improvised solutions, potentially leading to damaged components or personal injury. For instance, attempting to remove a rusted exhaust clamp without penetrating oil significantly increases the risk of bolt breakage, thereby extending the overall duration of the task and requiring additional component replacement.
Furthermore, preparation includes a thorough assessment of the existing exhaust system’s condition. This evaluation allows for the proactive identification of potential complications, such as severely corroded fasteners or damaged hangers. Preemptive ordering of replacement parts based on this assessment minimizes downtime and ensures that the maintenance can proceed without interruption. Real-world scenarios underscore the significance of this proactive approach; for example, if a visual inspection reveals a cracked exhaust manifold, acquiring a replacement prior to disassembly prevents the vehicle from being immobilized while awaiting part delivery. Similarly, cleaning the work area and organizing tools promotes efficiency and reduces the likelihood of errors during the installation process.
In summary, adequate preparation is not merely a preliminary step but an integral component of exhaust system component replacement. It is a causal factor directly influencing the speed, safety, and effectiveness of the entire procedure. Neglecting this phase introduces unnecessary risks and diminishes the likelihood of a successful and durable outcome. A prepared approach translates directly into a smoother, more controlled, and ultimately more satisfying installation experience.
2. Secure Fastening
Securely fastening the sound-dampening component is a crucial determinant in the overall effectiveness and longevity of any exhaust system maintenance procedure. Insufficiently tightened fasteners present a direct threat to the system’s integrity, leading to exhaust leaks, vibration-induced loosening, and eventual component detachment. Conversely, over-tightening fasteners risks damaging threads, distorting flanges, or compromising the structural integrity of the component itself. The optimal approach necessitates adherence to manufacturer-specified torque values, typically expressed in Newton-meters or foot-pounds, which represent the calibrated balance between secure clamping force and material stress. Ignoring these specifications introduces a substantial element of uncertainty, increasing the probability of system failure.
Consider the case of an individual who neglects to properly torque the bolts connecting a sound-dampening component to the exhaust pipe flange. The resulting lack of a gas-tight seal allows exhaust gases to escape, creating excessive noise and potentially introducing dangerous carbon monoxide into the vehicle cabin. Furthermore, the vibrations inherent in an operating vehicle exacerbate the problem, gradually loosening the improperly secured fasteners and leading to premature component failure. In contrast, an experienced technician, employing a calibrated torque wrench and adhering to specified torque values, ensures a secure and reliable connection that minimizes the risk of leaks and vibration-induced degradation. This meticulous approach not only extends the lifespan of the component but also safeguards the health and safety of the vehicle occupants.
In conclusion, secure fastening is not a mere afterthought, but an integral component of the entire process. The application of appropriate techniques and adherence to manufacturer specifications are essential for achieving a durable and leak-free installation. The consequences of neglecting this critical step range from minor annoyances, such as increased exhaust noise, to severe safety hazards, such as carbon monoxide poisoning. Therefore, a commitment to secure fastening practices is essential for both novice and experienced individuals engaged in exhaust system maintenance.
3. Proper Alignment
Correct positioning of the sound-dampening component within the exhaust system is fundamentally linked to its operational effectiveness and longevity. Misalignment induces stress on connecting pipes and joints, creating points of vulnerability susceptible to premature failure. The consequence of improper positioning manifests as exhaust leaks, reduced engine performance due to compromised backpressure, and accelerated wear on system components. The installation process must, therefore, prioritize accurate alignment as a critical step to ensure structural integrity and optimal functionality. For example, if the newly installed unit is forced into a position that deviates from the exhaust pipe’s natural trajectory, the resultant strain on the connecting flange will inevitably lead to cracking and gas leakage, negating the sound-dampening effect and potentially causing sensor malfunctions.
Achieving accurate positioning frequently requires the use of supporting tools such as exhaust hangers and adjustable stands to maintain the component’s position during the fastening process. Visual inspection plays a vital role; ensuring that all connecting flanges are flush and that there are no visible bends or twists in the exhaust piping is paramount. In instances where slight adjustments are necessary, careful manipulation of the system, supported by the use of rubber mallets and pry bars, can assist in achieving the required alignment. An important consideration is the thermal expansion of the exhaust system. The system must be aligned in such a manner that normal thermal expansion and contraction do not cause binding or excessive stress. Clamps and flexible joints are designed to accommodate these movements, provided the initial alignment is correct.
In conclusion, proper alignment is not merely a supplementary step in the replacement process, but an integral component of its success. It mitigates potential mechanical stresses, minimizes the risk of leaks, and contributes directly to the overall durability and performance of the vehicle’s exhaust system. Failure to adequately address this aspect during installation effectively compromises the entire undertaking, leading to increased maintenance requirements and potentially significant repair costs. Attention to alignment, therefore, represents a cost-effective and essential element of responsible vehicle maintenance.
4. Leak Prevention
Effective exhaust system maintenance necessitates a strong emphasis on preventing gas leakage, which is integrally linked to the success of component installation. A compromised seal at any point within the system, including the component’s connection points, results in diminished engine performance, increased noise pollution, and the potential ingress of hazardous exhaust fumes into the vehicle cabin. Leak prevention is not an isolated task, but rather a series of meticulous actions taken throughout the component installation process. Failure to prioritize leak prevention can negate the benefits of the new component, rendering the entire procedure ineffective. For example, if a new sound-dampening unit is installed without properly sealing the connecting flanges, escaping exhaust gases will circumvent the unit’s intended function, failing to reduce noise levels effectively. The proper selection and application of gaskets, sealants, and clamps are paramount in establishing and maintaining a gas-tight seal.
Practical implementation of leak prevention involves several key techniques. Prior to assembly, thorough cleaning of all mating surfaces is essential to ensure proper adhesion of gaskets and sealants. Inspection of flanges for flatness and the removal of any corrosion or debris prevents uneven sealing. When applying sealants, adherence to the manufacturer’s recommendations regarding application thickness and curing time is critical. Furthermore, the correct tightening sequence of fasteners is vital to evenly distribute clamping force and avoid distortion of the flanges, which can create leak paths. Post-installation, a careful inspection of all connections for any signs of escaping exhaust gas is necessary. This can be accomplished by visually examining the joints for soot deposits or by using a soapy water solution to identify escaping gas bubbles. Prompt identification and correction of any leaks are crucial to prevent further degradation of the system and maintain optimal vehicle performance.
In conclusion, the prevention of leaks is not simply a desirable outcome but a fundamental requirement for successful component installation. It necessitates a comprehensive approach encompassing proper preparation, careful execution, and rigorous inspection. The consequences of neglecting this aspect of exhaust system maintenance extend beyond mere inconvenience, potentially impacting vehicle performance, safety, and regulatory compliance. Therefore, a steadfast commitment to leak prevention practices is indispensable for anyone engaged in exhaust system maintenance.
5. Component Compatibility
The selection of components is paramount for achieving a successful exhaust system maintenance outcome. Matching replacement components to the vehicle’s specifications ensures not only proper fitment but also optimal performance and adherence to regulatory standards. Disregarding compatibility can result in functional inadequacies, safety hazards, and potential legal ramifications.
- Engine Displacement and Configuration
A sound-dampening component designed for a four-cylinder engine will typically possess a different internal structure and flow rate than one intended for a V6 or V8 engine. Installing a component designed for a smaller engine on a larger one can create excessive backpressure, reducing power output and potentially damaging the engine. Conversely, installing a component designed for a larger engine on a smaller one may result in insufficient backpressure, leading to poor fuel economy and increased emissions. The correct matching of component specifications to engine parameters is, therefore, essential for maintaining optimal performance.
- Exhaust System Diameter and Configuration
Exhaust systems are designed with specific pipe diameters to optimize exhaust gas flow. Installing a sound-dampening component with an incompatible inlet or outlet diameter can create restrictions in the exhaust flow, negatively impacting engine performance and fuel efficiency. Moreover, the physical configuration of the component, including its length and shape, must align with the vehicle’s undercarriage to ensure proper clearance and prevent interference with other components. Deviations from the original design can lead to rattling, vibration, and potential damage to the exhaust system or surrounding vehicle components. Example: A component with an offset configuration needed when the original design is offset to avoid the body.
- Emission Control System Compliance
Modern vehicles are equipped with sophisticated emission control systems, and sound-dampening components must be compatible with these systems to ensure compliance with environmental regulations. The installation of non-compliant components can compromise the effectiveness of catalytic converters or other emission control devices, leading to increased emissions and potential failure to pass emissions inspections. Furthermore, tampering with emission control systems is often illegal and can result in fines or penalties. Verify your purchase and installation with a legal expert to avoid further issues.
- Mounting Points and Hanger Locations
A compatible unit will align with the vehicle’s existing mounting points and hanger locations, facilitating a secure and stable installation. Incorrectly positioned mounting points can induce stress on the exhaust system, leading to premature failure. Moreover, improperly supported components are prone to vibration and rattling, creating noise and potentially damaging surrounding vehicle components. Precise alignment with existing mounting points ensures proper weight distribution and minimizes the risk of mechanical failure.
In summary, ensuring sound-dampening component compatibility is not merely a matter of convenience but a critical determinant of performance, safety, and regulatory compliance. Careful consideration of engine displacement, exhaust system configuration, emission control system requirements, and mounting point alignment is essential for a successful installation. Neglecting these factors can lead to a range of problems, from reduced engine performance to environmental damage and legal penalties.
Frequently Asked Questions About Exhaust Sound Dampening Component Installation
The following section addresses common inquiries regarding the replacement procedure, aiming to provide clarity on crucial aspects and dispel potential misconceptions.
Question 1: What tools are indispensable for replacement?
A comprehensive toolkit includes a socket set, wrench set, penetrating oil, jack stands, safety glasses, work gloves, and potentially an exhaust pipe cutter or saw. The specific tools may vary depending on the vehicle make and model, as well as the condition of existing fasteners.
Question 2: Is specialized expertise required to undertake this task?
While some mechanical aptitude is beneficial, the process can be managed by individuals with basic automotive knowledge and the willingness to follow detailed instructions. However, if unfamiliar with automotive repair or lacking confidence, professional assistance is recommended to ensure safety and proper execution.
Question 3: How does one identify the correct replacement?
The vehicle’s make, model, year, and engine type are essential for accurate identification. Cross-referencing these details with manufacturer catalogs or consulting with automotive parts specialists can ensure compatibility. Also, physical measurements of the existing component can aid in confirming proper dimensions.
Question 4: What are the potential hazards associated with this procedure?
Potential hazards include exposure to rust, sharp edges, and potentially toxic exhaust fumes. Additionally, improperly supporting the vehicle can lead to serious injury. Always use jack stands on a level surface and wear appropriate safety gear.
Question 5: How often should the sound-dampening component be inspected or replaced?
The lifespan varies depending on driving conditions and material quality. However, periodic inspection for rust, damage, or excessive noise is recommended. Replacement is typically necessary when the component is significantly corroded, damaged, or no longer effectively reduces exhaust noise.
Question 6: Can aftermarket components enhance performance?
Certain aftermarket components are designed to improve exhaust flow, potentially increasing engine horsepower and torque. However, it is crucial to select components that are compatible with the vehicle’s emission control system and that comply with local noise regulations. Research and due diligence are essential.
Understanding these FAQs provides a solid foundation for proceeding with component replacement. Addressing these considerations minimizes potential complications and promotes a successful outcome.
The subsequent segment of this article will further explore advanced techniques to optimize the results.
Conclusion
The procedures encompassing the act of how to install a muffler have been explored, revealing essential considerations for safe and effective execution. The critical aspects of preparation, secure fastening, proper alignment, leak prevention, and component compatibility serve as pillars for successful maintenance. Adherence to specified torque values, meticulous examination of mating surfaces, and verification of component specifications contribute to optimal system performance and longevity.
Mastery of these techniques empowers individuals to maintain their vehicle’s exhaust system with competence. While the complexity of automotive repair can seem daunting, a systematic approach and a commitment to safety ensure a successful outcome. Continuous adherence to best practices ultimately protects vehicle value and promotes responsible operation.


![Affordable Bristol Discount Muffler: [Your Suffix Here] Best Mufflers for Cars & Trucks | Performance, Sound & Durability Upgrades Affordable Bristol Discount Muffler: [Your Suffix Here] | Best Mufflers for Cars & Trucks | Performance, Sound & Durability Upgrades](https://dnamufflers.com/wp-content/uploads/2026/01/th-334-300x200.jpg)


